Artifex Fabricatum
The Doomsday Corps of Engineers (x10)
The Doomsday Corps of Engineers (x10)
Couldn't load pickup availability
“They dig faster than the ash falls, most days. That is the whole job description, and the whole epitaph, if it comes to that.”
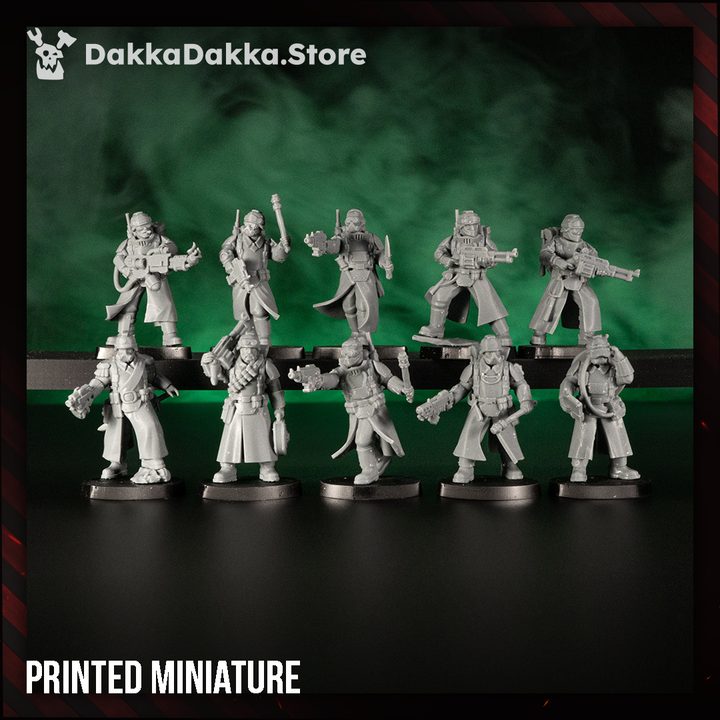
The Doomsday Corps of Engineers arrives as a set of ten physical resin miniatures, each standing 29mm from feet to eyes, cast in clean grey resin with supports already removed and surfaces cleaned, ready to assemble and paint straight from the box. This is a full combat-engineering squad built for the grimmest theatres of war, dressed in long greatcoats, layered flak armour, and respirator masks that tell you exactly what kind of air they expect to be breathing on deployment.
Supplied unpainted.
The squad covers a solid spread of roles. The commanding officer stands in full dress with epaulettes, a sidearm, and a crushed enemy trophy beneath his boot. Flanking him are troopers carrying rotary grenade launchers, combat shotguns, and a flamer already lit. One soldier strides forward with a knife drawn and pistol raised, giving the unit a sense of forward momentum even at rest. Goggled scouts, gas-masked veterans, and a heavily kitted backpack carrier round out a squad that looks varied and lived-in without ever losing cohesion. A sprue of additional weapon arms and shoulder options is included, giving you meaningful choices when it comes to loadout and pose variety.
Sculpted by DakkaDakka, this set sits cleanly alongside the wider grimdark infantry range in both scale and aesthetic.
The Doomsday Corps reads as an elite siege and engineer formation. The silhouettes are broad, the equipment is heavy, and the details reward close painting. Every face, buckle, and boot tells the story of a unit that has been deep in the worst of it and come back ready for more.
Painting Guide: The Doomsday Corps of Engineers (x10)This squad rewards a methodical approach. Work from the innermost layers out, keeping the greatcoat as the dominant tone and letting metallics and leather provide contrast across the armour and equipment.
1. Prime
- Spray with a dark grey or black primer for maximum shadow depth on the recesses of the coats and armour panels.
- A zenithal pass of light grey from above will help identify raised areas before painting begins.
2. Armour Base
- Base the greatcoats in a deep slate grey, such as Mechanicus Standard Grey or equivalent, keeping coverage thin enough to preserve cast detail.
- Block in armour plates in a desaturated olive green, then apply a thin brown wash to pull definition into panel lines and rivets.
3. Trim and Details
- Pick out leather straps, pouches, and backpack harnesses in a mid-brown, then shade with a dark sepia wash for warmth and contrast.
- Paint respirator lenses and goggle lenses in deep red, highlighted with a small spot of bright orange or white to suggest a faint glow.
4. Weapons
- Base all metal weapons and barrels in a dark gunmetal, then drybrush lightly with bright silver on raised edges to simulate worn metal.
- For the flamer fuel canister, apply a warm orange at the nozzle tip, blending up through yellow to white at the hottest point of the flame.
5. Weathering
- Apply a thin oil wash of dark brown across the entire model to deepen recesses and unify the palette after drybrushing.
- Use a small piece of sponge foam to dab chipping medium or dark grey randomly across armour edges and coat hems to suggest field wear.
6. Bases
- Match the bases to a ruined urban or trench warfare theme using textured paste, small grit, and a wash of dark brown followed by a pale grey drybrush on rubble highlights.
This is an adult hobbyist collectible, not a toy. Not suitable for children under 14 years due to small, detailed parts.
 Designed by
DakkaDakka
View all 346 miniatures
Designed by
DakkaDakka
View all 346 miniatures