Artifex Fabricatum
Supa Crumpa - 177mm Resin Miniature
Supa Crumpa - 177mm Resin Miniature
Couldn't load pickup availability
“Named for the sound it makes going through a wall. The pilot grins because the ash hasn't found a way in yet.”
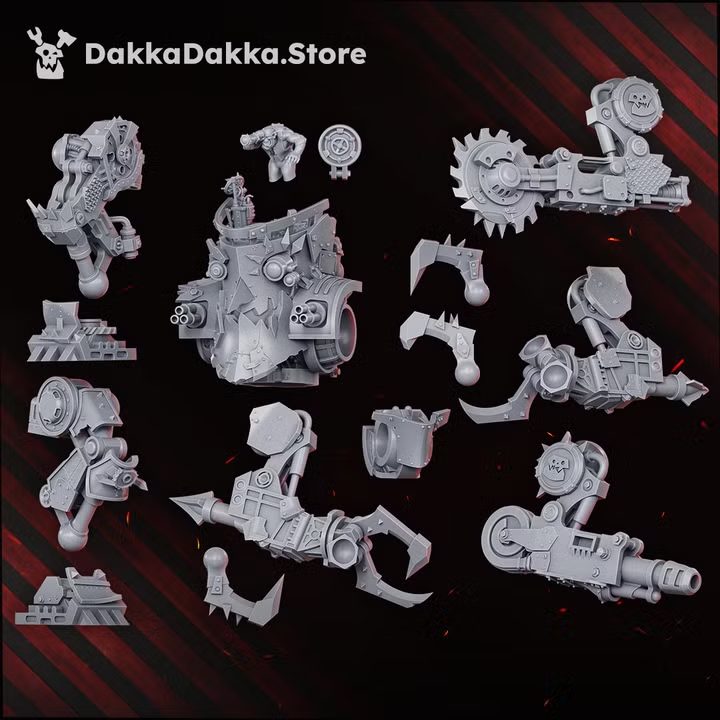
The Supa Crumpa arrives as a single physical resin miniature, standing an imposing 177mm tall, cast in clean grey resin with supports already removed and surfaces cleaned, ready to assemble and paint straight from the box. Supplied unpainted. The kit contains 16 parts, giving you a rewarding and satisfying build packed with mechanical character at every angle, from the bolted chest plates and jury-rigged gun barrels to the claw arm, saw blade, and the grinning green pilot perched in the open cockpit above.
This hulking mech walker is a masterpiece of ramshackle engineering, bristling with spikes, mismatched armour panels, red hazard markings, and the kind of brutal, cobbled-together charm that only a machine built for pure destruction could carry. The yellow and bare-metal colour scheme shown across the kit photographs gives you a vivid starting point, though the design rewards experimentation with alternate clan colours and heavy weathering. Sculpted by DakkaDakka, the Supa Crumpa brings enormous presence to any display shelf or battlefield.
The model measures approximately 177mm tall, 170mm wide, and 144mm deep, making it a commanding centrepiece that will dominate any collection. Each copy is cast in grey resin, with parts pre-cleaned so you can move straight into assembly and painting with minimal prep work required.
Base is included as shown. No glue, paint, or tools are included.
Painting Guide: Supa Crumpa - 177mm Resin MiniatureThe paint scheme shown across these photographs leans into battered industrial yellow armour plating contrasted with bare weathered metal, vivid red details, and a grimy, war-worn finish. Here is a step-by-step guide to replicate or adapt that look.
1. Prime
- Apply a black spray primer across the entire assembled or sub-assembled model for maximum contrast and depth in the recesses.
- For the yellow panels, follow with a zenithal pass of grey primer from above to help the yellow base coats appear brighter with less effort.
2. Armour Base
- Basecoat all armour panels with a mid-yellow paint such as Averland Sunset or Iyanden Yellow contrast over a grey undercoat.
- Build up with a brighter yellow highlight such as Flash Gitz Yellow on raised edges and corners to give the plates real punch.
3. Trim and Details
- Paint all metal framework, joints, and mechanical parts with a dark metallic such as Leadbelcher or Vallejo Gunmetal Grey.
- Pick out red accent panels, hazard symbols, and eye lenses with Mephiston Red, then highlight with Evil Sunz Scarlet.
4. Weapons
- Paint the saw blade and axe claw with the same dark metallic base, then edge highlight with Stormhost Silver for a sharp, freshly ground look.
- Add a spot of bright green to the pilot cockpit figure using Warpstone Glow and a highlight of Moot Green for a vivid contrast against the yellow chassis.
5. Weathering
- Apply a brown or black oil wash across the entire model, allowing it to settle into every recess and panel line before wiping back the raised surfaces.
- Use a sponge or stipple brush to dab Rhinox Hide and Leadbelcher randomly across armour edges for chipping and battle damage.
- Finish with a light drybrush of Ryza Rust or a rust-coloured pigment powder around bolt heads, joints, and lower panels.
6. Bases
- The base shown uses industrial scatter terrain textures. Paint with Mechanicus Standard Grey, drybrush Administratum Grey, then add patches of Stirland Battlemire texture paint and tufts for a ruined urban feel.
This is an adult hobbyist collectible, not a toy. Not suitable for children under 14 years due to small, detailed parts.
 Designed by
DakkaDakka
View all 355 miniatures