Artifex Fabricatum
Grokk Tuskhauler - Monster Truck Transport
Grokk Tuskhauler - Monster Truck Transport
Couldn't load pickup availability
“Six wheels and a horn assembly that has taken down two gate towers this year alone. The crew never wash the ash off; they say it keeps the tyres gripping.”
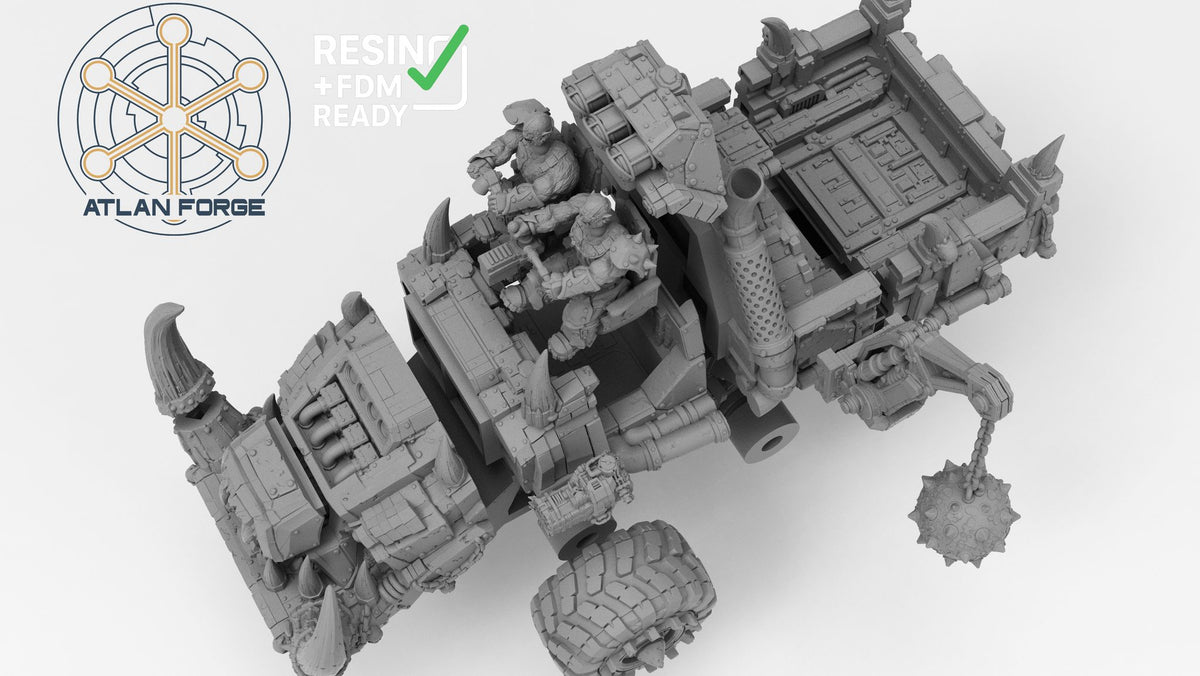
The Grokk Tuskhauler is a colossal, six-wheeled monster(approx 84mm x 180mm) transport bristling with crude industrial armour, massive bone tusks, skull trophies, and the kind of brutal, ramshackle engineering that defines the Grokk warband's appetite for destruction. Every panel is layered with riveted plating, exhaust pipes, chunky knobbled tyres, and chains draped across the chassis with savage intent. A spiked wrecking ball swings from a rear crane arm, and an oversized horn assembly dominates the front, curving outward like the head of a charging beast fitted with iron and menace.
The cab section houses a hunched crew position, flanked by glowing yellow headlamps and a row of orange-lit barrel exhausts that suggest an engine tuned far beyond any sensible limit. The open flatbed at the rear is walled with thick plated panels, horn protrusions, and grinning skull mounts that mark this machine as both a fighting vehicle and a trophy of conquest. This sculpt has been designed by Atlan Forge and carries the dense, characterful detail work that runs throughout their range of warband vehicles and infantry.
The Grokk Tuskhauler arrives as a physical multi-part resin miniature, supplied at 32mm scale, with supports already removed and surfaces cleaned. Parts assemble with standard plastic or superglue and arrive ready to prime and paint. The level of surface detail rewards careful layering and washes, with distinct material zones across tusks, metal, rubber tyres, and bare bone trophies giving painters a wide range of textures to work across.
Supplied unpainted and unassembled. Paints, glue, and bases are not included.
Painting Guide: Grokk Tuskhauler - Monster Truck Transport
This guide walks through a warband-consistent colour scheme matching the red, gunmetal, and bone tones shown in the studio photographs, with practical steps for achieving strong contrast and a battered battlefield finish.
1. Prime
- Apply a grey or black spray primer across all parts before assembly to ensure full coverage in recesses
- A black primer base will deepen shadows naturally and reduce the number of wash layers needed later
2. Armour Base
- Basecoat all plated hull panels with a deep burgundy red such as Khorne Red or Mephiston Red
- Block in all mechanical and piping sections with a mid-tone grey such as Mechanicus Standard Grey
3. Trim and Details
- Drybrush metal trim, bolts, and exhausts with Leadbelcher, keeping strokes light on raised edges only
- Paint horn and tusk sections with a pale bone base such as Zandri Dust, then build up to Screaming Skull at the tips
4. Weapons
- Paint the wrecking ball and chain sections with Leadbelcher then wash with Nuln Oil for depth
- Highlight chain links individually with a fine edge of Ironbreaker to separate them visually
5. Weathering
- Apply Agrax Earthshade across the red panels in thin, controlled glazes to knock back the brightness and suggest grime
- Use a torn blister foam piece to stipple Typhus Corrosion along panel edges, wheel arches, and the undercarriage
- Add streaking effects on vertical panels with thinned brown paint, pulling downward from bolt heads and vents
6. Bases
- Match to your existing warband basing scheme. A rubble and ash wasteland style using Astrogranite Debris and a grey drybrush reads well alongside this vehicle's scale and palette
This is an adult hobbyist collectible, not a toy. Not suitable for children under 14 years due to small, detailed parts.
 Designed by
Atlan Forge
View all 137 miniatures
Designed by
Atlan Forge
View all 137 miniatures